DVXplorer S Duo

Date: 2023-06-11
Note
This documentation is a work-in-progress. Please check back frequently for updates and provide us your feedback!
Please read carefully through the whole documentation to use the DVXplorer S Duo to its full potential and be aware of its limitations.
The DVXplorer S Duo (S standing for System) is an embedded camera, featuring a dual-sensor solution comprised of our DVS event-based sensor and a state-of-the-art OnSemi AR0234 global-shutter industrial color image sensor. Processing power is provided by an Nvidia Jetson Nano SOM, with a quad-core ARM Cortex-A57 processor, running at up to 1.43 GHz, 4 GB of DDR4 RAM and an Nvidia Maxwell GPU with 128 CUDA cores.
Features
Hardware
Nvidia Jetson Nano SOM (4x ARM Cortex-A57 @ 1.43 GHz, 4GB DDR4-RAM, Maxwell GPU @ 128 cores)
iniVation DVS event sensor, 640x480 resolution (VGA)
OnSemi AR0234 global-shutter color frame sensor, 1920x1200 resolution (WUXGA)
Bosch BMI160 IMU sensor, 6 axis gyroscope + accelerometer
16 GB of eMMC storage total, 6 GB available for user data and recordings
Gigabit Ethernet connector (RJ45), supports Power-Over-Ethernet (POE 802.3af)
USB 3.0 Type C connector, with locking screws
Mini-HDMI 1.4 connector
10x 2.54mm pins female connector for SPI, GPIO and PWM
Size: H 32mm x W 80mm x D 92mm
Weight: 220g, without lenses
Lenses: 2x S-Mount (M12), 2x 6mm focal length provided with camera
Software
Yocto Linux-based distribution
Linux4Tegra kernel 4.19
DV-SDK remote runtime
Yocto-based SDK to cross-compile custom software
Robust A/B update procedure, with separate partition for user data
Intended Usage
This device is meant to be used as an embedded platform for processing sensor data, running preferably attached to an Ethernet network.
It runs a custom Linux distribution, based upon the Yocto project, that directly integrates our DV-SDK software and automatically runs its runtime on boot. This allows users to connect using the GUI, setup modules and their connectivity on the embedded camera itself and run them there. Custom modules can also be uploaded and used.
Processing performance is limited, and will be at its worst if you try to use the camera like any of our other USB camera products, by just visualizing data on the DV GUI. Processing and data reduction should happen as much as possible on the device itself.
Data can be sent off the camera via either USB or Ethernet, but their limited bandwidth has to be taken into consideration. We recommend Ethernet for more robust deployments, due to its easier cabling situation and guaranteed higher power delivery capabilities.
Performance Considerations
Processing
The Nvidia Jetson Nano offers relatively limited CPU and GPU performance. Custom code will need to be carefully optimized to run in real-time.
The amount of data that can be processed is limited and below what the sensors can provide at their peak performance.
The main bottlenecks for sensor data processing are:
decoding of events from the camera into AEDAT4 format, caps at around 30 Mevents/s
debayering (color interpolation) of image frames, caps at around 50 FPS
Todo
Later software releases will try to continuously improve the performance of algorithms and modules included by default in the DV-SDK software.
Networking
Getting data off the camera is limited by the respective networking connection’s bandwidth:
Ethernet: max. 1 Gbit/s
USB 3.0 (network mode): max. 1.3 Gbit/s
A full resolution color frame at 1920x1200 takes 6.6 MB of data uncompressed, so you could transmit at most 18 frames per second, using all the bandwidth only for frames, over the Ethernet connection. Or, if sending only events, the USB connection would max out at around 9 Mevents/s. Sending all the data off the camera is not its intended mode of usage and will result in mediocre performance. It is imperative that as much processing and data reduction happens on the device. Best-case, only final features such as “person detected at position (X,Y)” or “42% activity in scene” would get sent off the device during normal operation.
The visualization function in the GUI also works by sending data out over the network and is constrained by these same limitations.
Compression can be enabled in the network output modules to improve the situation, though the trade-off is increased CPU usage. By default compression is disabled (NONE) for this reason, if you want to enable it, we recommend LZ4, as it is a good trade-off between compression and CPU usage.
Power
The Jetson Nano can run in two power states:
5W mode, plus system, total ~7.5W
10W MAXN mode, plus system, total ~12.5W
Higher power modes offer better CPU and GPU performance.
Ethernet POE 802.3af can provide up to 15W and thus run both modes without issues.
USB 3 can by default only provide up to 4.5W, so a normal USB 3.0 port will never be able to safely run this device. In truth, many USB ports and especially powered USB hubs can provide more power, often up to 15W (3A). In the case of USB Type A ports used with an A-to-C cable, this cannot be detected by the device. For USB Type C ports and cables, it is possible to detect higher power modes of 7.5W (1.5A) and 15W (3A) using the CC lines, if the host reports these properly.
For this reason, to try and guarantee power stability, our device always boots in the lowest power mode, and currently stays there.
Todo
Later software releases will detect and report as much information as possible concerning power available, mode selected and current power consumption. We’ll also implement automatically switching to higher performance modes based upon that information, so as to always offer optimal performance. You can use the nvpmodel tool over SSH for now if you want to force higher performance modes manually.
Thermal
Warning
Please always be careful of the temperature when handling the device!
The device is passively cooled through the visible aluminium fins on its top. For best cooling performance, make sure these point up to allow for convective cooling to happen optimally. The device can become quite hot under continuous full load in the highest power settings, we have measured temperatures of up to 60°C (140° F) on the outer metal casing. Under normal load the temperature stays around 40° C (104° F).
Todo
Later software releases will report in detail on measured temperature. You can use the tegra-stats tool over SSH for now if you want to get this information displayed.
Time Synchronization
The timestamps of event, frame and IMU data in DV-SDK are defined as microseconds since the Unix Time Epoch. Since the device runs Linux, it must be able to accurately set its real-time clock and keep it synchronized. This is a well-known and well-solved problem using network time synchronization techniques, such as the Network Time Protocol (NTP) or the Precision Time Protocol (PTP). It is even possible to use external hardware such as GPS and Atomic Clocks for certain use cases. For network time synchronization to work, the device must be able to reach an external network, usually the internet, and talk to pool.ntp.org. If you connect over Ethernet with DHCP, we assume the resulting connection can access the internet and the global NTP servers. If you connect over USB, you’ll have to enable network forwarding for the camera first, see below for instructions.
Todo
Support for setting NTP server addresses manually and getting them from DHCP will come in a later software release. Later software releases will also show the time synchronization status in an easy to digest manner in DV.
Note
Support for advanced time synchronization via PTP and GPS is not supported on the current hardware.
The network chip of the Nvidia Jetson Nano does not support PTP hardware timestamping, nor is it possible to attach most common GPS receivers since the UART pins are not exposed.
USB Network Forwarding
Network forwarding enables the device to access the wider network and internet when connected over USB. This is required for time synchronization features, and in the future, for automatic system image updates.
Linux
Execute the following shell-script as root to enable network forwarding to the camera:
sudo ./usb-internet.sh
Script content (usb-internet.sh):
#!/bin/sh

echo 1 > /proc/sys/net/ipv4/ip_forward
iptables -A FORWARD -m conntrack --ctstate ESTABLISHED,RELATED -j ACCEPT
iptables -A FORWARD -j ACCEPT -s 192.168.55.0/24
iptables -A POSTROUTING -t nat -j MASQUERADE -s 192.168.55.0/24
MacOS
Todo
MacOS USB Network Forwarding instructions not yet available.
Windows
Todo
Windows USB Network Forwarding instructions not yet available.
DV-runtime access
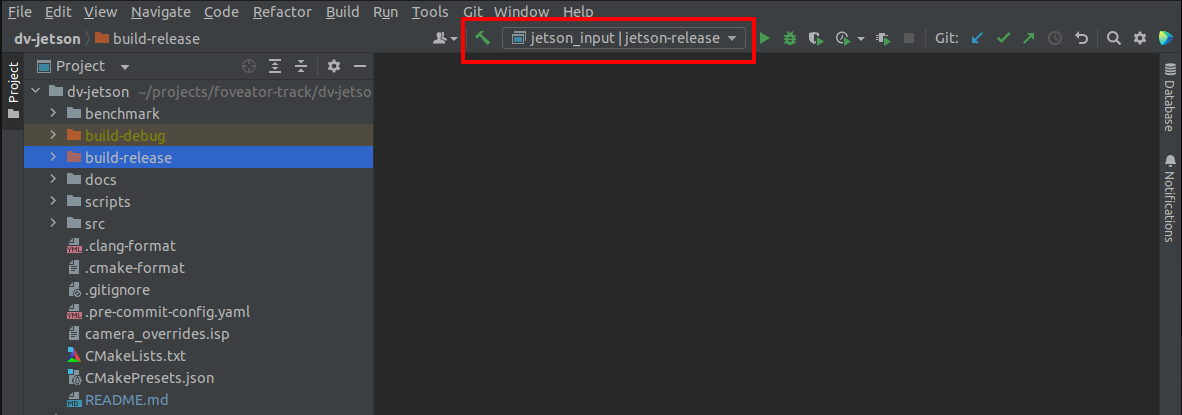
The embedded camera is running an instance of our DV-SDK software’s runtime. It allows to connect to the camera from the GUI remotely, visualize data, add/remove and connect modules to process data.
Via USB
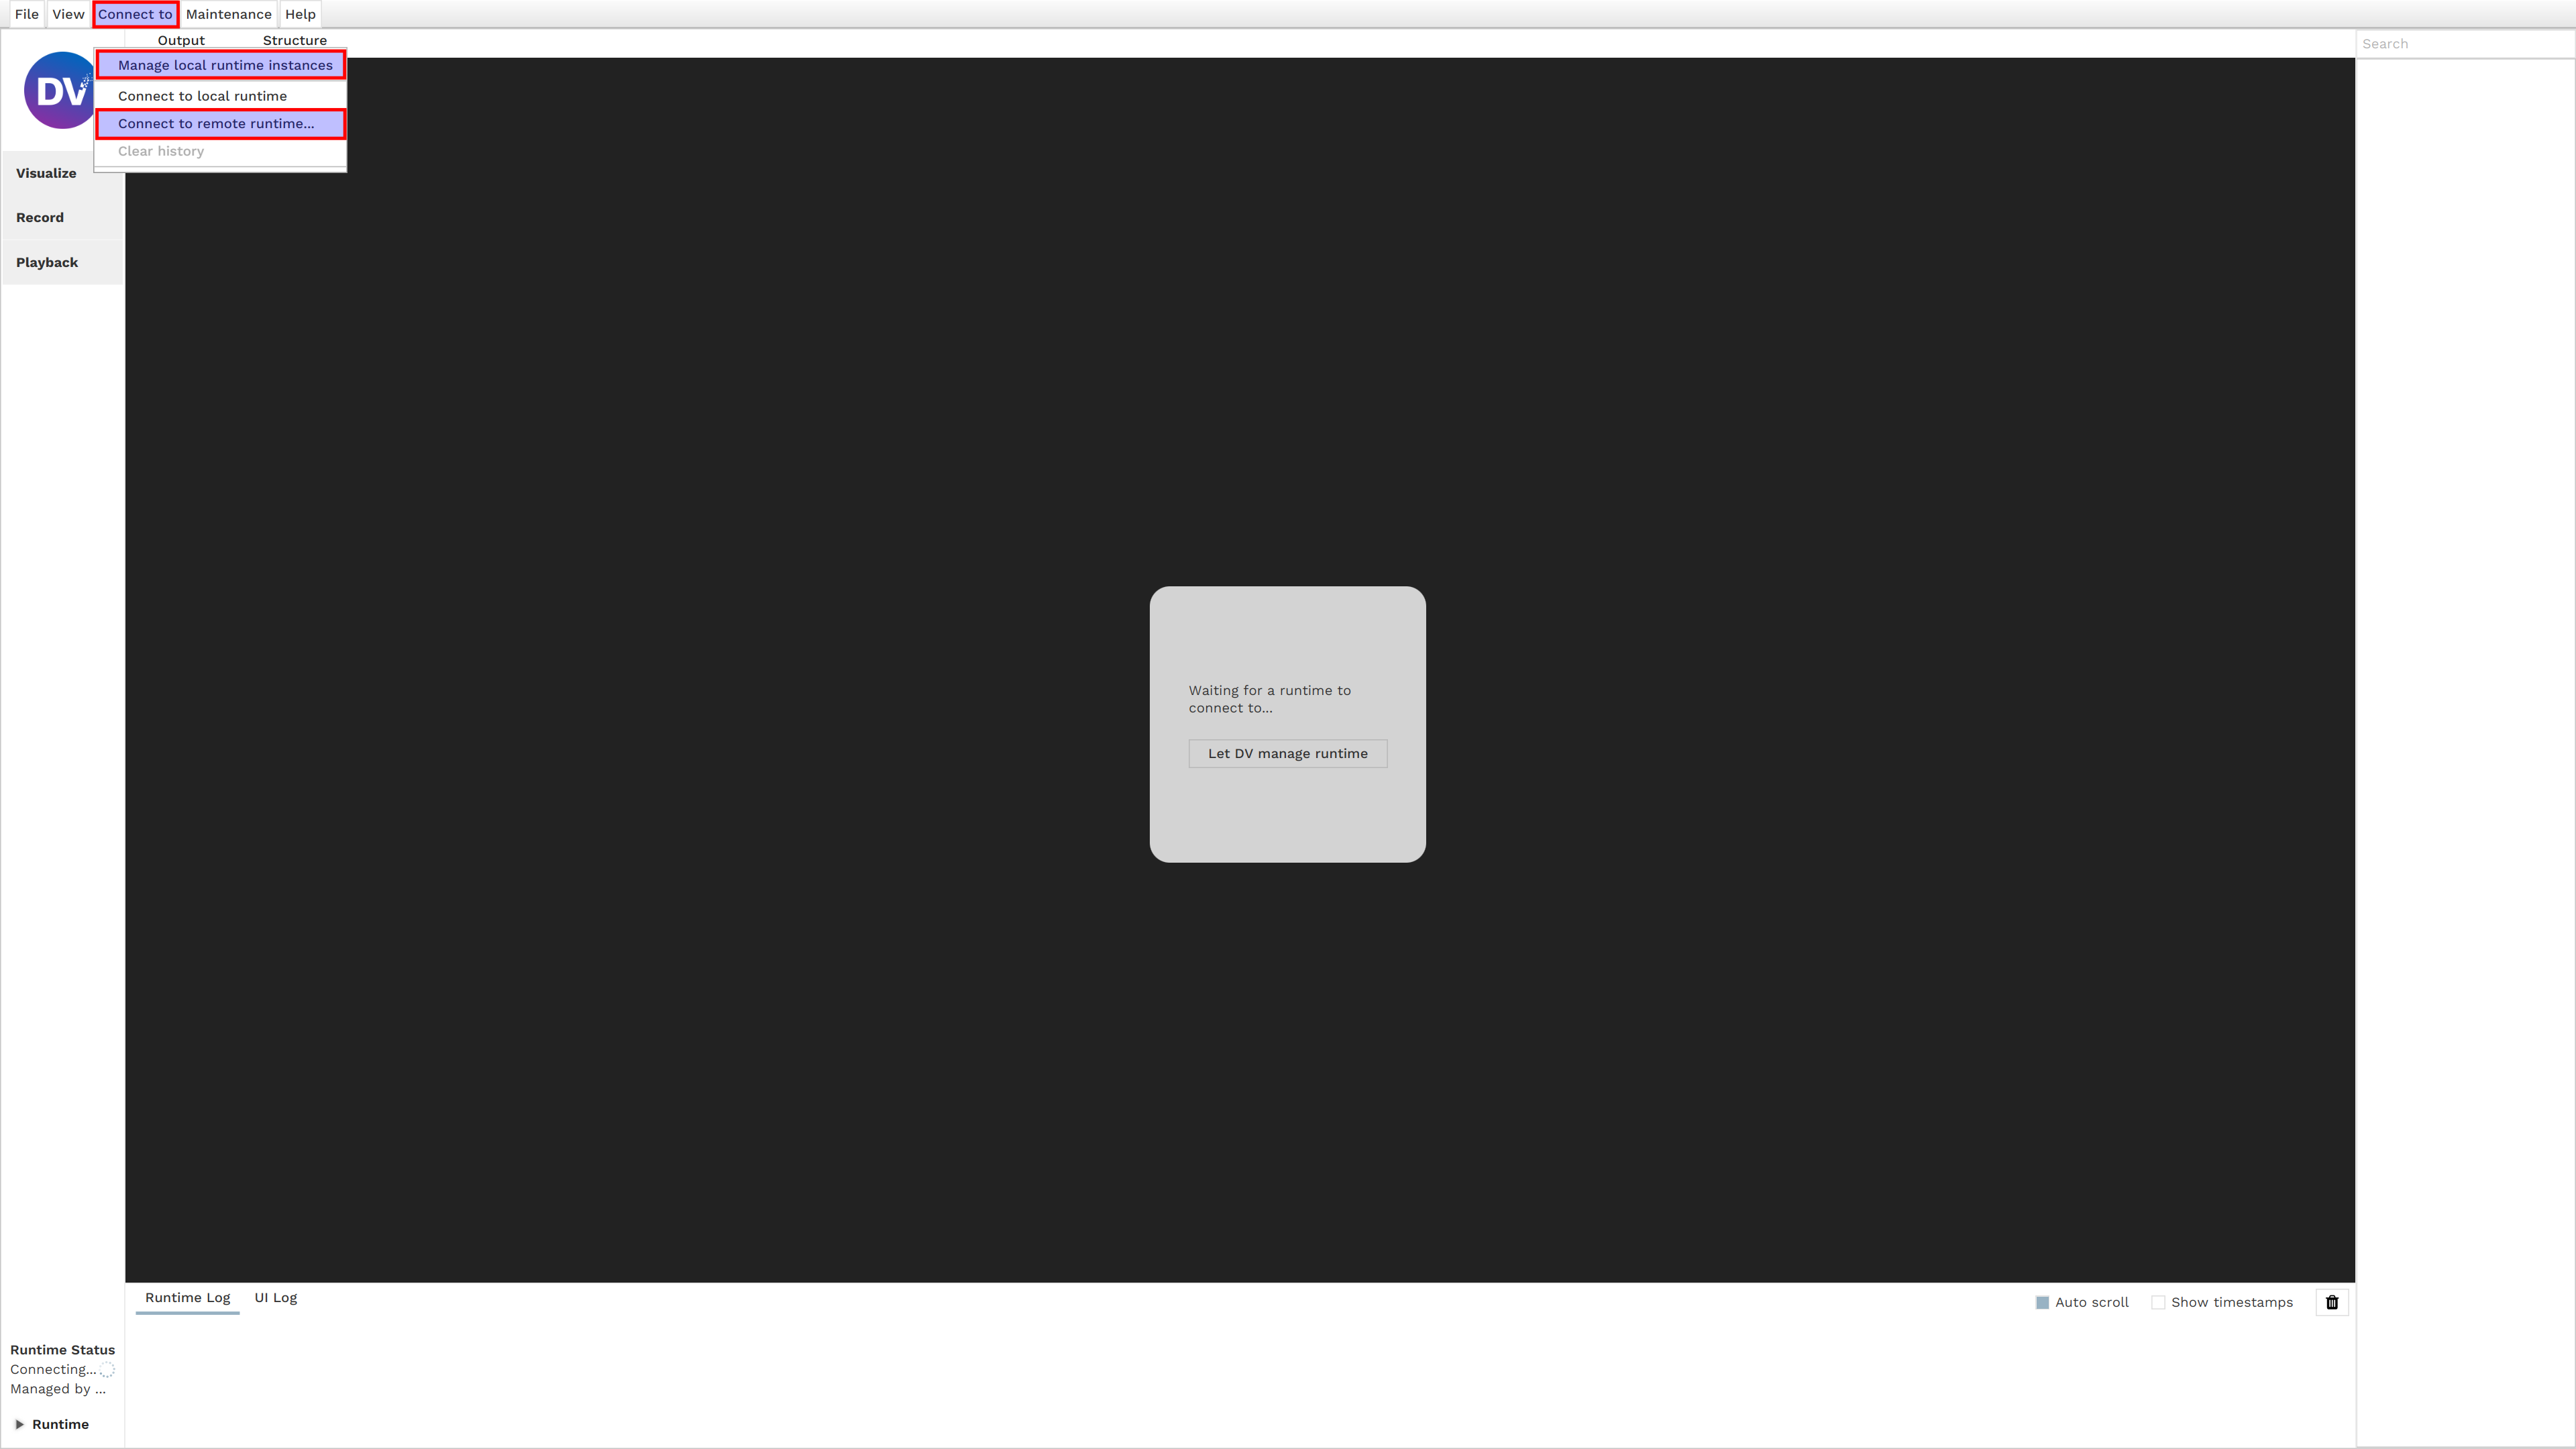
Open the GUI, in the top menu select “Connect to”, in the resulting drop-down menu disable “Manage local runtime instances”, the greyed out “Connect to remote runtime…” will then become available. Select it and in the ensuing pop-up enter the following parameters:
IP Address: 192.168.55.1
Port: 4040
Finally, click on Connect.
Note
When connecting via USB, the IP address is always this same one. As such, only one camera can be connected via USB at the same time to the same host system.
Via Ethernet
The same procedure as for USB applies to connect to the remote runtime, with the difference the IP address will be different and depend on your network configuration. Usually DHCP will assign an unique IP to the camera automatically. The presence of the camera’s dv-runtime service on the network is advertised through the mDNS auto-discovery service, you can use tools such as avahi-discover to see all the cameras on your network. Alternatively ask your network administrator to check and communicate the address to you.
Todo
Later software releases will allow more flexible network configurations. For now, if you have need for a very specific network configuration, SSH into the device and edit the systemd-networkd configuration file at /data/config/20-wired.conf manually.
DV-runtime usage
The default configuration for the DV-SDK runtime always contains a dv_jetson_input module, which is the interface to the system’s three main sensors.
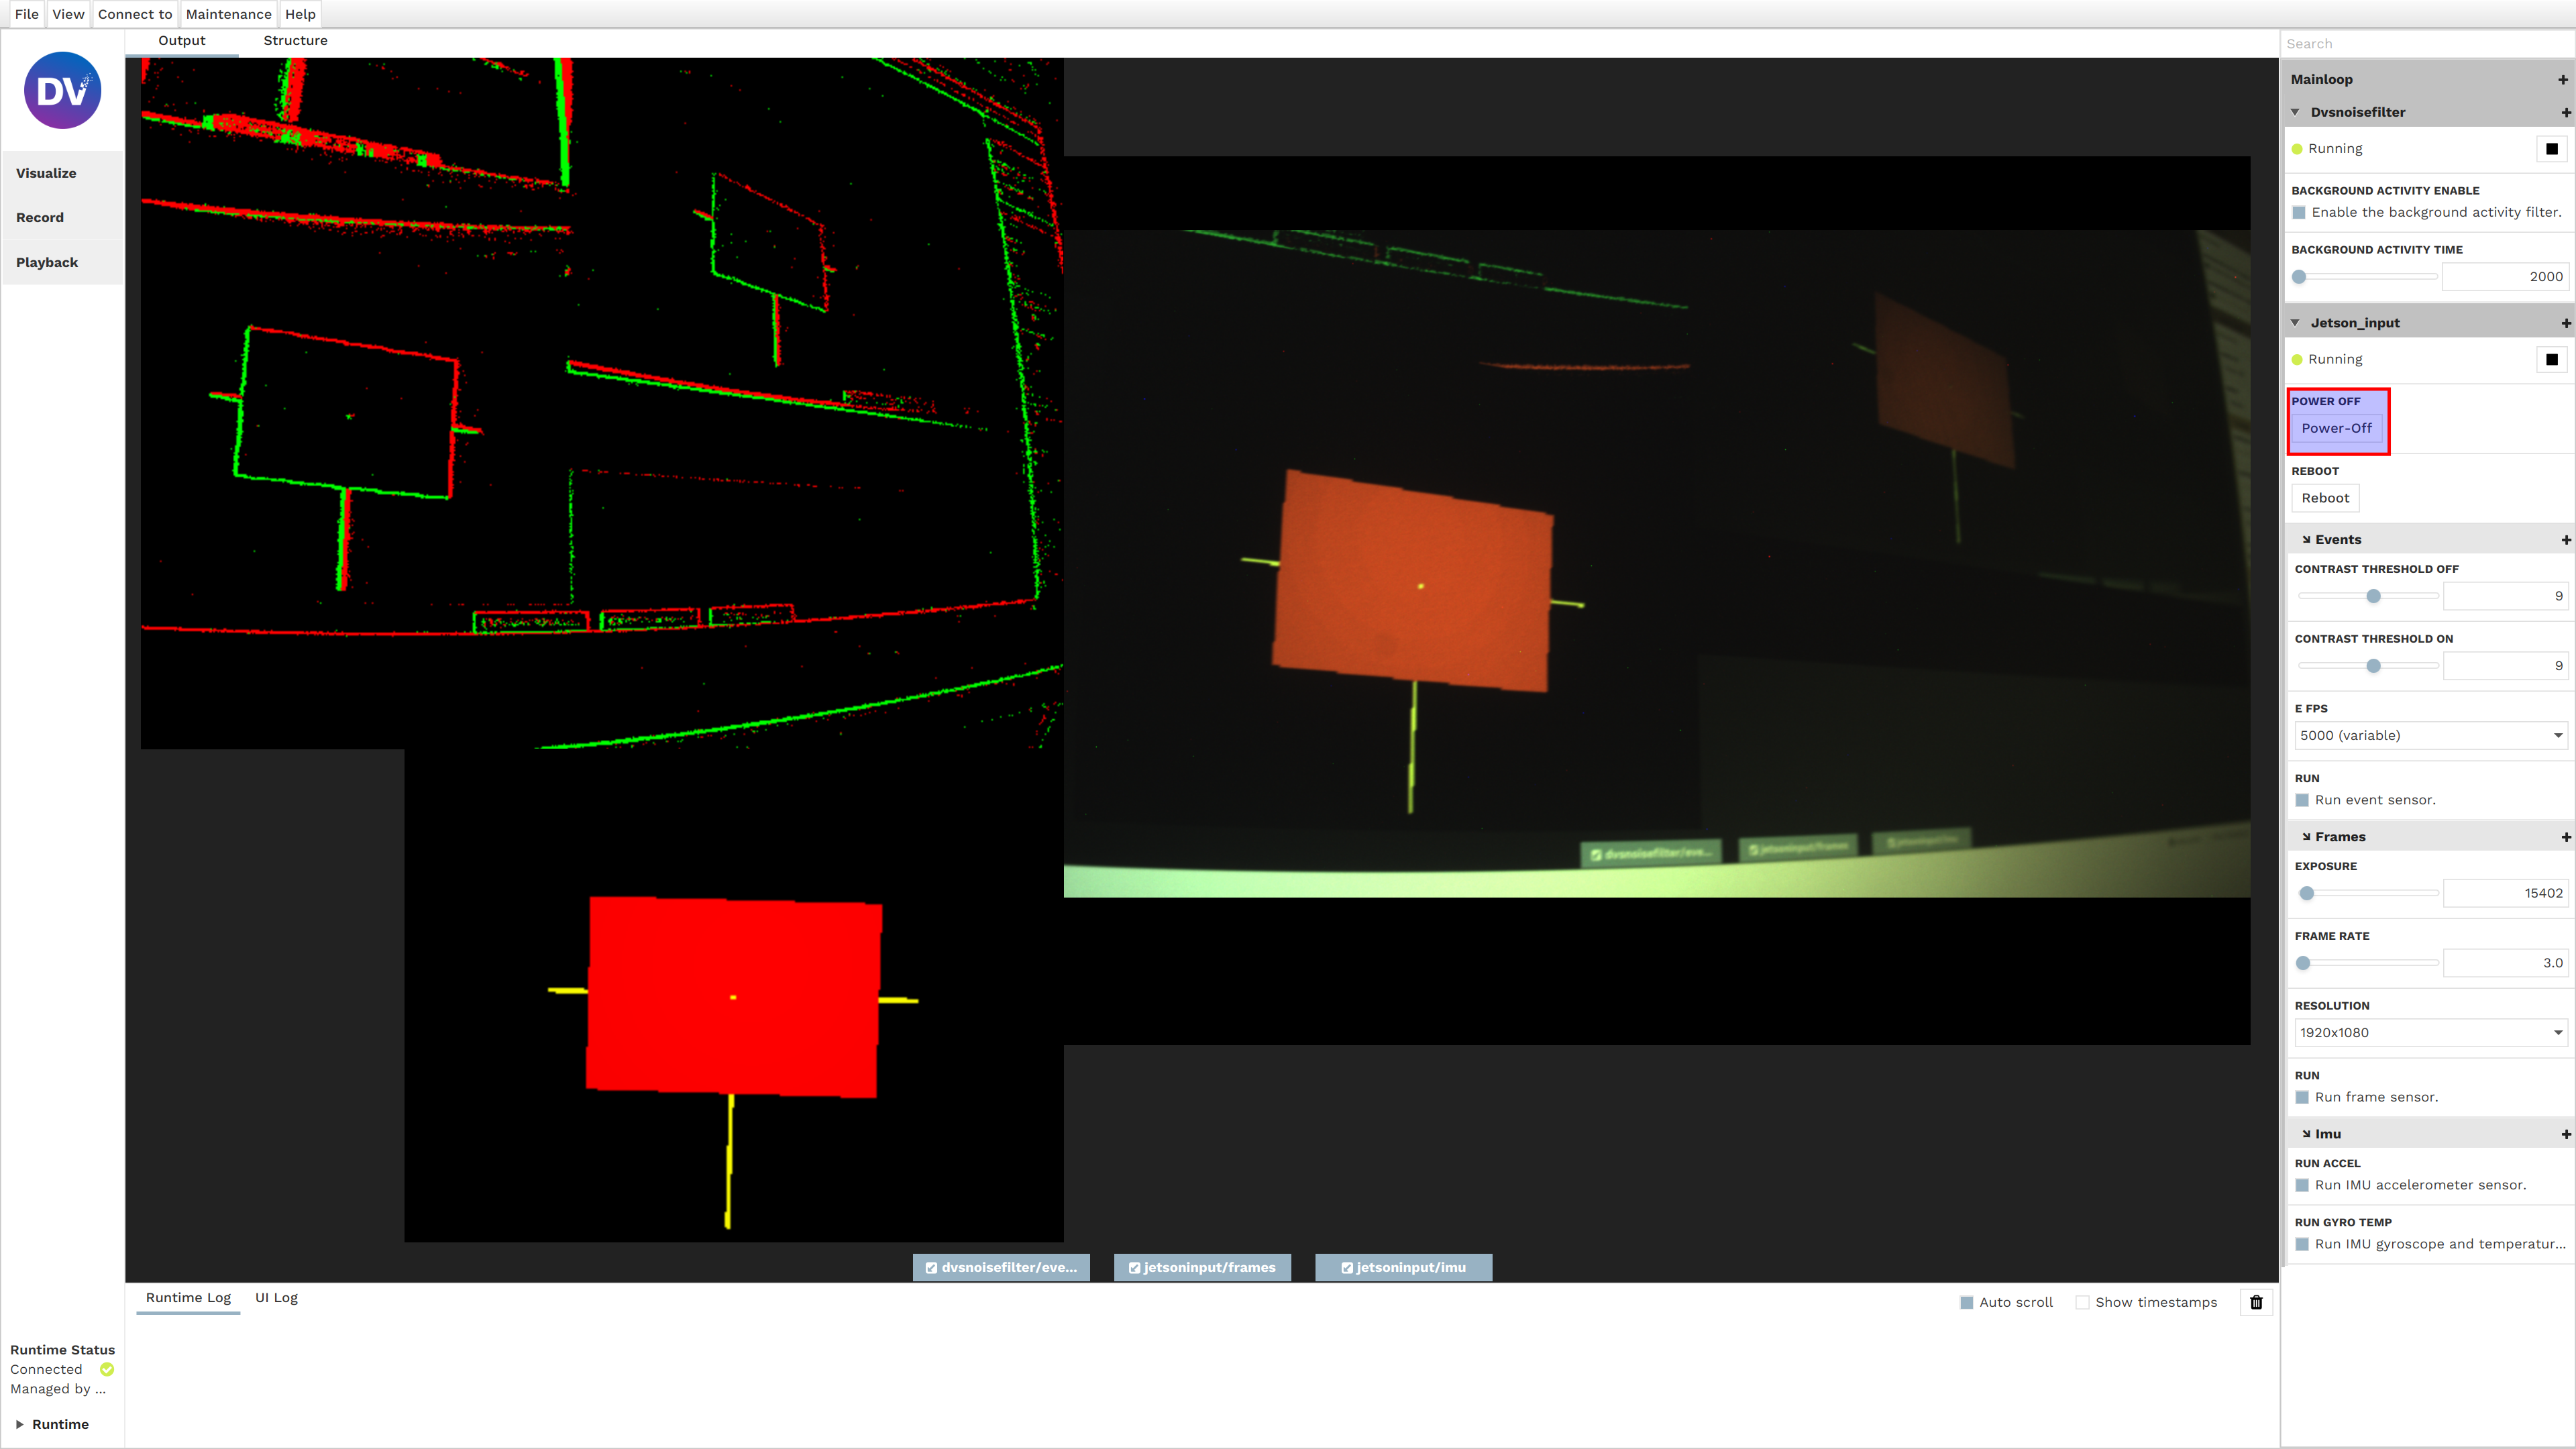
All sensor settings can be reached from the right side-menu, as usual click on the + sign to access and search the full list of options. The most important options are already displayed in the right side-menu by default.
Power-Off / Reboot
Warning
Please power off the device using the appropriate Power-Off button in DV!
Of particular note are the Power-Off and Reboot buttons. As the names suggest, they turn off or reboot the device.
It is very important to properly power off the device through clicking this button or, alternatively, sending the
poweroff command via SSH. Improperly shutting the device down by disconnecting its power supply (USB or Ethernet
cable) will result in the loss of the current DV runtime configuration, as it is only saved at shut-down. Further, if
any recording was happening at the time (dv_output_file module), it will be truncated and improperly terminated, which
can lead to loss of data and performance.
Todo
Later software releases will offer a button to manually save the current configuration to the device at any point in time. It will still be recommended to properly shut it down via the appropriate buttons.
You can also always use the DV GUI Projects feature to save and reload any configuration states as XML files.
Frame Sensor Control
The most important controls for the frame sensor concern the frame-rate, the exposure and the resolution. The resolution defines the number of pixels to read out, which takes a certain amount of time T_READOUT for a specific resolution. This defines the maximum theoretical frame-rate. The frame-rate control allows the artifical lengthening of T_READOUT to slow down readout to a preferred rate by the user, let’s call that time T_READOUT_USER. The MAXIMUM(T_READOUT_USER, EXPOSURE) defines the effective time needed to read a frame, and thus the real frame-rate you’ll get from the device.
Todo
Later software releases will introduce automatic exposure control support, as well as more fine-grained controls for gain and other advanced features.
SSH access
Warning
Please set a secure root password for SSH access as soon as possible!
It is possible to access the device via SSH as root, currently no password is set by default. We urge users to set a secure password as soon as possible. SFTP is also enabled to upload custom DV modules and update the system image.
IP Address: see DV-runtime access
Port: 22
User: root
Password: none
Todo
Future software releases will change how authentication works, disabling password-less root access and requiring users to log-in using SSH keys. A method to upload/import SSH keys over DV will be provided.
Calibration
At present, there is no dedicated calibration support available. Users are required to carry out standard camera calibration themselves. Nevertheless, due to the limitations of the current hardware, it is not feasible to execute the calibration procedure directly on the DVXplorer-S DUO, as it cannot handle the computational demands.
In order to calibrate with the help of an external pc or server, follow these steps:
Connect the camera to your computer via USB or via Ethernet.
Open DV software and connect to the camera runtime as explained here. This will allow you to visualize the camera output. Use the gui to:
Focus the camera using these instructions.
Record raw event data (or frames for the image sensor) from the camera while moving the calibration pattern in front of it. You can do this by setting up the proper structure in the camera runtime (connect “jetson input” to “dv output file” module), as follows:
Record Events Only
Record Frames Only
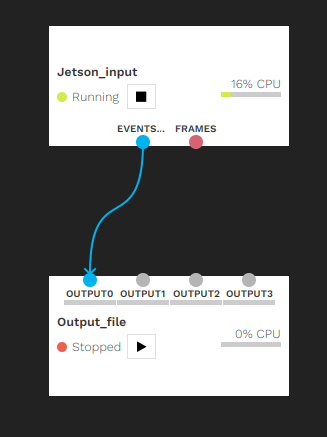

Note: The recording will be stored on the camera.
Once the recording is finished: on your computer, copy it from the camera using:
scp root@<your_camera_address>:/var/lib/dv-runtime/<your_recording.aedat4> <local_directory>
Disconnect DV from remote runtime.
Connect DV to local runtime and run the calibration procedure following these instructions. Remember to replace “camera input” with “input_file” module, and select the previously downloaded aedat4 file (/local/path/to/< your_recording.aedat4>) as input.
Write and compile your own modules
You can write your own DV-SDK C/C++ modules to process data following your personal requirements. You will need to compile them specifically to run on the DVXplorer S Duo. To do this, you’ll need to install the SDK and configure your development environment to use it for building your module. We currently provide detailed instructions for the JetBrains CLion IDE.
Todo
Instructions for setting up the Yocto SDK with the Qt-Creator and Visual Studio Code IDEs will follow.
Todo
Support for installing the SDK on Windows and MacOS will follow. MacOS should work the same as Linux but has not yet been tested.
Install Yocto SDK on Linux
Download the latest Yocto SDK installer for Linux (.sh file) from release.inivation.com.
Latest official release (2023-06-07_13-18-51 git revision ef6d1e5c)
Install the SDK by executing the installer:
chmod 0755 ./inivation-image-full-jetson-nano-inivation-v2-x86_64-glibc-toolchain-2023-06-07_13-18-51-master-ef6d1e5c.sh
./inivation-image-full-jetson-nano-inivation-v2-x86_64-glibc-toolchain-2023-06-07_13-18-51-master-ef6d1e5c.sh
Install it to a user-accessible, easy to remember folder like /home/youruser/inivation-sdk/.
Note
If you’re not running the latest system image, you’ll have to download and install the correct version of the SDK for that specific version of the system image. To find out the system image version you’re running, SSH into the device and take a look at the /etc/build file.
Todo
Later software versions will show build version information in DV.
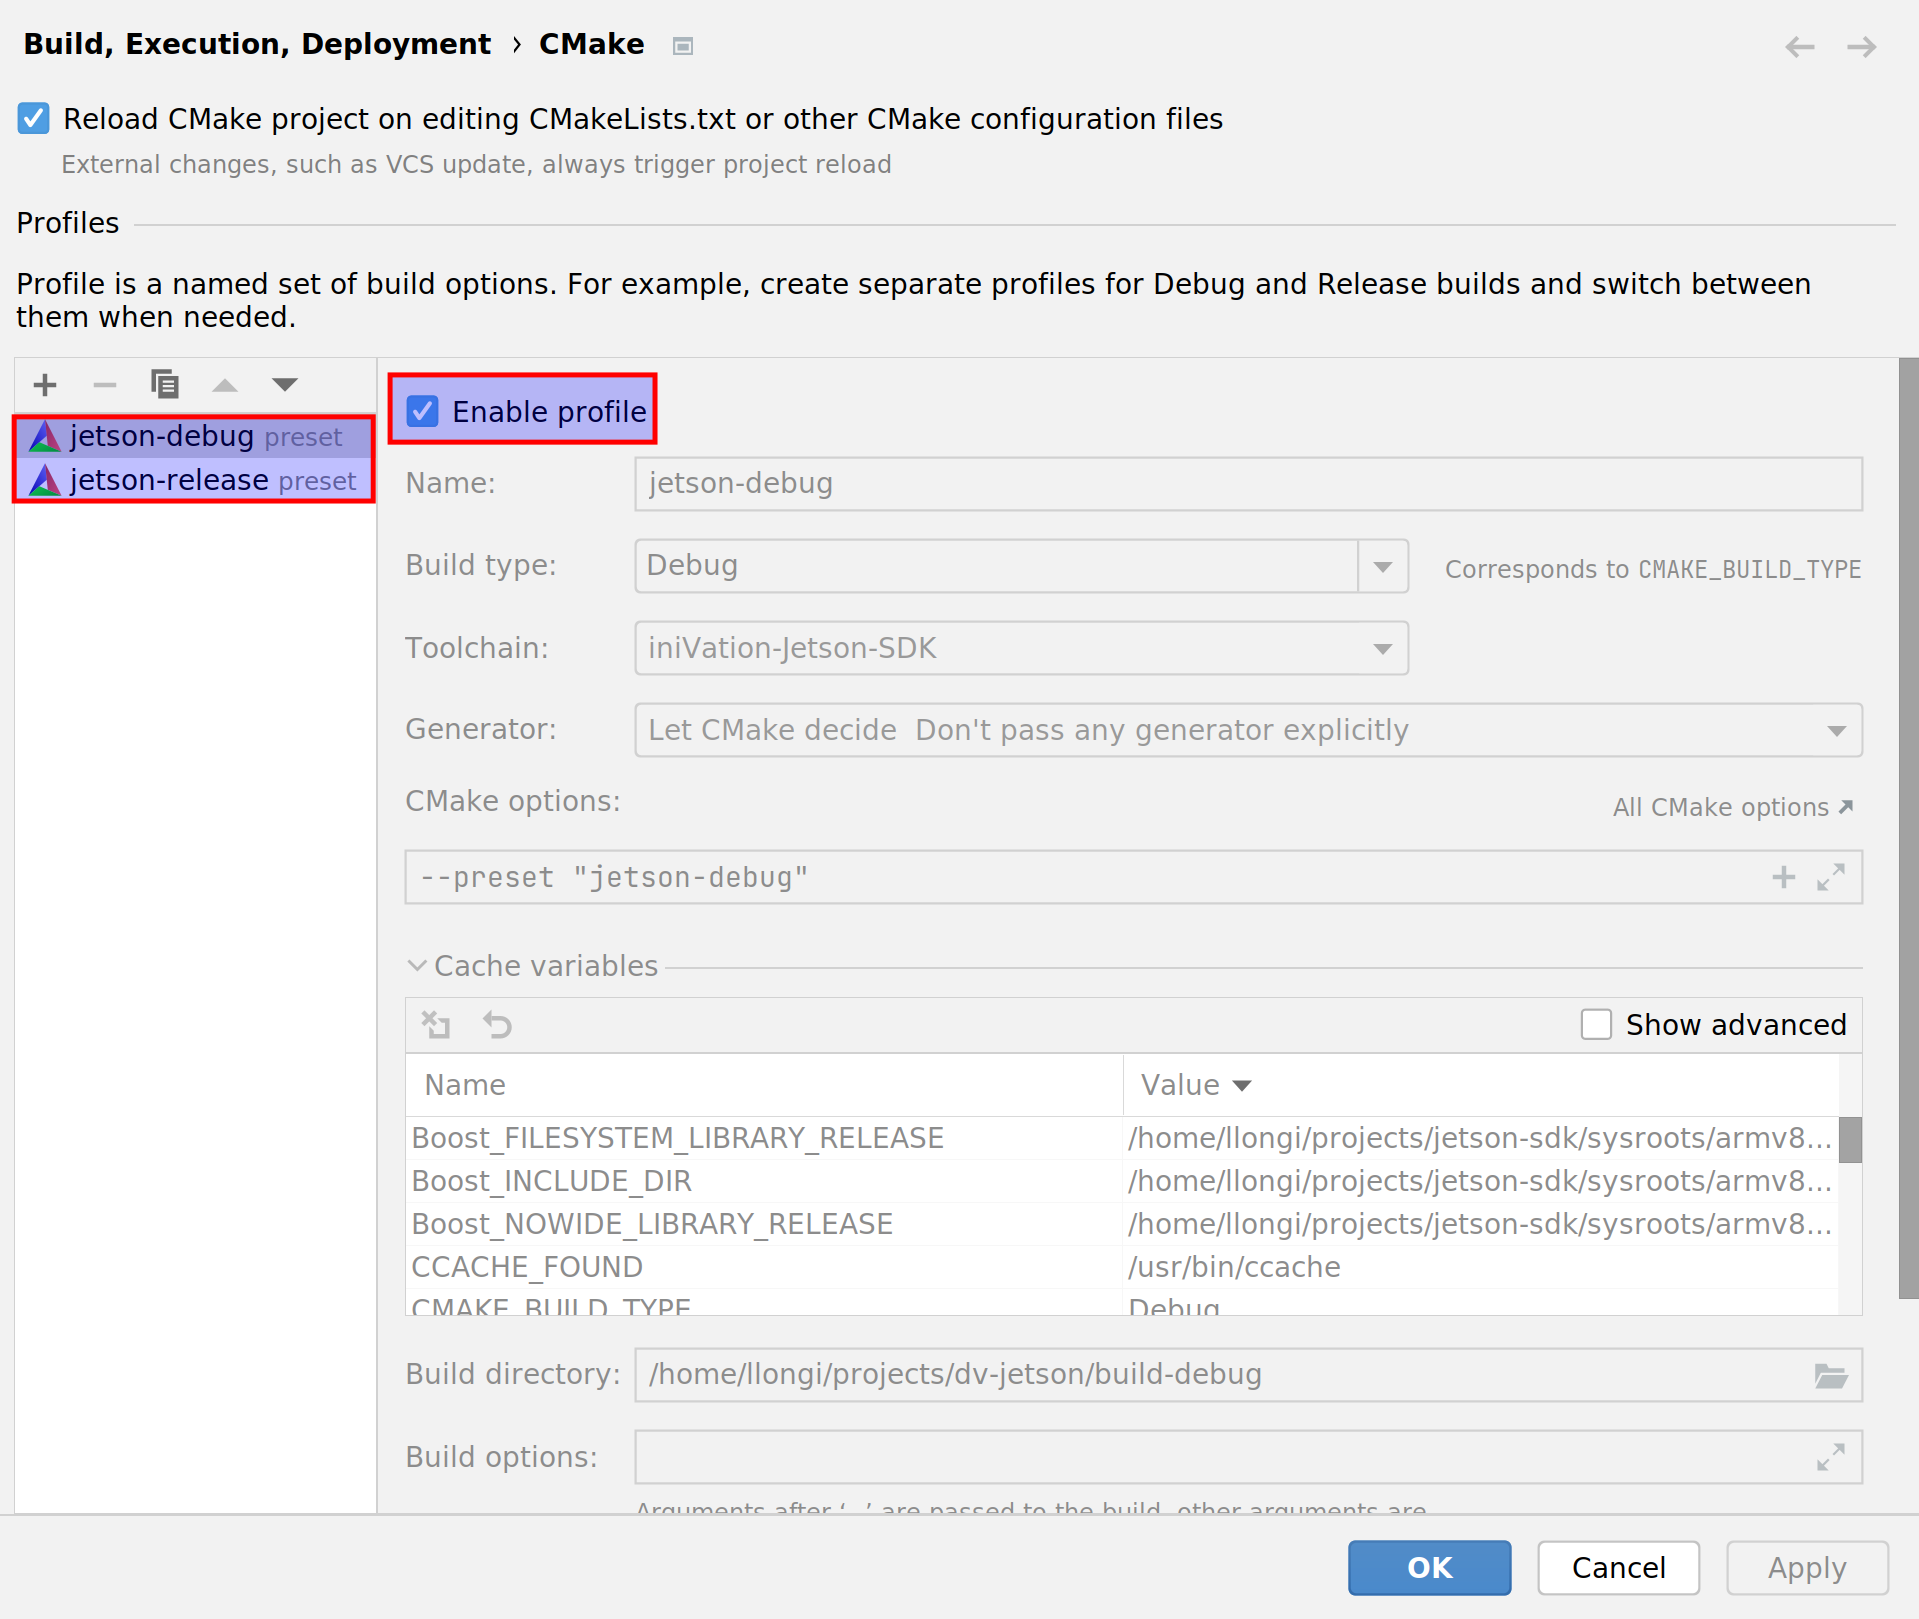
Add Yocto SDK to CLion
Make sure to have at least version 2023.1 of CLion installed. In CLion you first have to add the SDK as a toolchain. Go to “Settings -> Build, Execution, Deployment -> Toolchains”, press the + sign above the left-side list of toolchains and then select “System” to add a new system toolchain. Now change its name to “iniVation-Jetson-SDK” and click on “Add environment -> From File”, then in the “Environment file” dialog select the SDK environment file at:
/home/youruser/inivation-sdk/environment-setup-armv8a-inivation-linux

Leave everything else unchanged, CMake and Debugger should remain the “Bundled” version. Please ensure the name is exactly “iniVation-Jetson-SDK”.
Open Project in CLion
Now open the dv-example-cpp project as you would normally by navigating to it and selectings its directory. The CMake Configuration window will pop up, disable and remove the default ‘Debug’ or ‘Release’ profiles, and instead enable the ‘jetson-debug’ and ‘jetson-release’ profiles. These are automatic CMake Presets that will configure all the needed paths and variables for you.
Build a Module in CLion
Once the CMake presets are set, you can run CMake and build the modules as you would normally do using CLion.
Transfer Modules to Device
To ease the transfer of built modules to the camera device during testing, we recommend using a script to automate this operation. The following will move the module to its proper place and restart dv-runtime on the device so it gets reloaded.
Usage: ./module-to-system.sh <device-IP-address> <path-to-built-module>

./module-to-system.sh 192.168.55.1 build-release/user_example.so
Script content (module-to-system.sh):
#!/bin/sh

sftp root@$1:/var/lib/dv-runtime/modules <<< $"put $2"
ssh root@$1 "systemctl restart dv-runtime.service"
Update system image
Download the latest system image from release.inivation.com, you will need the .mender file.
Latest official release (2023-06-07_13-18-51 git revision ef6d1e5c)
Upload it to the device using SFTP, we recommend putting the file in the temporary directory /var/tmp/:
sftp root@192.168.55.1:/var/tmp/ <<< "put inivation-image-full-jetson-nano-inivation-v2-2023-06-07_13-18-51-master-ef6d1e5c.mender"
Then log-in to the device via SSH, execute the installation command and reboot:
ssh root@192.168.55.1
mender install /var/tmp/inivation-image-full-jetson-nano-inivation-v2-2023-06-07_13-18-51-master-ef6d1e5c.mender
reboot
Once the device has rebooted, if everything appears to work correctly, log-in via SSH again and confirm the update:
ssh root@192.168.55.1
mender commit
In case you forget this last step, the device will automatically roll-back to the previously installed version on the next reboot. This is not an issue, you can simply execute the upgrade steps again.
Todo
Later software releases will implement automatic commit upon successfull update completion, as well as automatic discovery, download and installation of updates on users’ request.
History
2023-06-11: first version of documentation published
Open Issues
Todo
Later software releases will try to continuously improve the performance of algorithms and modules included by default in the DV-SDK software.
Todo
Later software releases will detect and report as much information as possible concerning power available, mode selected and current power consumption. We’ll also implement automatically switching to higher performance modes based upon that information, so as to always offer optimal performance. You can use the nvpmodel tool over SSH for now if you want to force higher performance modes manually.
Todo
Later software releases will report in detail on measured temperature. You can use the tegra-stats tool over SSH for now if you want to get this information displayed.
Todo
Support for setting NTP server addresses manually and getting them from DHCP will come in a later software release. Later software releases will also show the time synchronization status in an easy to digest manner in DV.
Todo
MacOS USB Network Forwarding instructions not yet available.
Todo
Windows USB Network Forwarding instructions not yet available.
Todo
Later software releases will allow more flexible network configurations. For now, if you have need for a very specific network configuration, SSH into the device and edit the systemd-networkd configuration file at /data/config/20-wired.conf manually.
Todo
Later software releases will offer a button to manually save the current configuration to the device at any point in time. It will still be recommended to properly shut it down via the appropriate buttons.
You can also always use the DV GUI Projects feature to save and reload any configuration states as XML files.
Todo
Later software releases will introduce automatic exposure control support, as well as more fine-grained controls for gain and other advanced features.
Todo
Future software releases will change how authentication works, disabling password-less root access and requiring users to log-in using SSH keys. A method to upload/import SSH keys over DV will be provided.
Todo
Instructions for setting up the Yocto SDK with the Qt-Creator and Visual Studio Code IDEs will follow.
Todo
Support for installing the SDK on Windows and MacOS will follow. MacOS should work the same as Linux but has not yet been tested.
Todo
Later software versions will show build version information in DV.
Todo
Later software releases will implement automatic commit upon successfull update completion, as well as automatic discovery, download and installation of updates on users’ request.
Safety Information
To prevent damage to property or injury to yourself or to others, read this safety information in its entirety before using this product.
This product is intended to be used in a laboratory and for industrial applications under controlled conditions.
We strongly recommend that you only use high quality USB cables, like the ones provided by iniVation. Using low quality USB cables could cause damages to the device.
Keep the product dry. Do not handle the product with wet hands. Do not handle the plug with wet hands. Do not operate the camera near water. This could cause damage to the device. The camera is not water-safe.
Handling: Handle your product with care. It is made of metal, glass, and plastic and has sensitive electronic components inside. The product can be damaged if dropped, burned, punctured, or crushed, or if it comes in contact with liquid. If you suspect damage to the product, please contact iniVation.
Repairing: Do not open the product and do not attempt to repair the product yourself. Disassembling the product may damage it and will void your warranty. If your product is damaged or malfunctions, please contact iniVation.
Do not disassemble or modify this product.
Do not touch internal parts that become exposed as the result of a fall or other accident.
Keep this product out of reach of children. Should a child swallow any part of this product, seek immediate medical attention.
Use travel converters or adapters designed to convert from one voltage to another or with DC-to-AC inverters.
Explosive and other atmospheric conditions. Connecting or using the product in any area with a potentially explosive atmosphere, such as areas where the air contains high levels of flammable chemicals, vapors, or particles (such as grain, dust, or metal powders), may be hazardous. Exposing the product to environments which have high concentrations of industrial chemicals, including near evaporating liquified gasses such as helium, may damage or impair the product’s functionality.
Turn this product off when its use is prohibited.
Do not leave the product where it will be exposed to elevated temperatures for an extended period such as in an enclosed automobile or in direct sunlight. This can lead to malfunction.
Correct Disposal

This product and its electronic accessories should not be disposed of with
other household waste. If you are unable to dispose of this item safely please return it to iniVation AG.
Certifications
DVXplorer S Duo is currently not certified for any purpose.